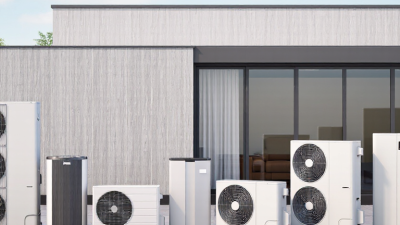
How to Improve Heat Pump Efficiency and Save Energy?
Improving heat pump efficiency begins with one practical question: how much heat does your home actually need? A correctly sized system can deliver steady warmth while using less electricity. An oversized unit may cycle too often, waste energy, and shorten its service life. Small details matter. Clean filters, clear outdoor coils, and well-sealed ducts can protect seasonal performance.
The International Energy Agency reports that modern heat pumps can be three to five times more energy-efficient than gas boilers. The U.S. Department of Energy also explains that high-efficiency air-source heat pumps can deliver up to three times more heating energy than the electricity they consume. These figures are valuable, but they are not automatic promises. Cold weather, poor insulation, incorrect controls, and high electricity prices can reduce real-world savings. A laboratory rating is not a household bill.
Jan Rosenow, Director of European Programmes at the Regulatory Assistance Project, has said, “Heat pumps are not a silver bullet, but they are an important part of the solution.” That caution is useful. Better results often come from combining professional heat-loss calculations, low-temperature radiators, smart thermostats, and regular maintenance. The Energy Saving Trust recommends reviewing system settings and improving insulation before installation, where practical.
There is room for doubt.
This guide examines measurable ways to improve heat pump efficiency, from installation choices to daily operating habits. It also considers uncomfortable realities, including upfront costs, regional climate, and imperfect user behaviour. Reliable savings require evidence, not optimistic assumptions.

Define Efficiency: COP 2–4, SEER2, HSPF2, and Annual Energy Use
A heat pump’s COP shows how much heat it delivers per unit of electricity. A COP of 2 means 2 kilowatt-hours of heat from 1 kilowatt-hour of electricity. The U.S. Department of Energy reports that air-source heat pumps commonly provide two to four times more heat than the electricity they consume. Performance drops during very cold weather. It also changes with defrost cycles, airflow, and outdoor temperature.
SEER2 measures seasonal cooling efficiency. HSPF2 measures seasonal heating efficiency. Both use updated test procedures referenced by the Air-Conditioning, Heating, and Refrigeration Institute. Higher ratings usually indicate lower electricity use under standard conditions. They do not predict every home accurately. A poorly sealed duct system can waste part of that advantage. Small installation errors matter.
Annual energy use offers a clearer household estimate. EnergyGuide calculations use standardized assumptions, while local weather, thermostat settings, insulation, and electricity prices create different results. ENERGY STAR testing also emphasizes proper sizing and verified performance. In practice, cleaning filters and keeping outdoor coils clear can protect airflow. A two-degree thermostat adjustment may help, but comfort should not be ignored. I have seen efficiency estimates fail when occupants used frequent emergency heat. Check that setting. Record monthly kilowatt-hours before and after maintenance. The comparison may be imperfect, yet it reveals the equipment’s real behavior better than a rating alone.
Size the Heat Pump to Design Load, Not Floor Area Alone
How to Improve Heat Pump Efficiency and Save Energy?
A heat pump should match the home’s design heating load, not its floor area alone. Two 1,500-square-foot houses can need very different equipment. One may have tight windows and insulated walls. The other may lose heat through old glazing, leaky ducts, and an uninsulated attic.
A qualified technician can calculate the load using local design temperatures, insulation levels, window areas, air leakage, and room orientation. Standardized methods, such as Manual J, provide a more reliable starting point than a simple square-foot rule.
I have seen homes with oversized systems cycle every few minutes during mild weather. That wastes energy and can leave rooms damp or unevenly heated.
Oversizing is not harmless.
An undersized unit may require backup heat too often during cold periods. An oversized unit may run briefly, fail to remove enough humidity, and wear its compressor through frequent starts. The best choice leaves room for real weather changes without treating every cold snap as an emergency.
Ask for the written load calculation and the selected capacity at your area’s winter design temperature. Check whether duct condition, airflow, and electrical limits were included.
Calculations can still miss unusual drafts or future renovations, so review the result honestly before installation. Floor area is only one clue.
Improve Airflow: Target About 400 CFM per Ton and Clean Filters
How to Improve Heat Pump Efficiency and Save Energy?
A heat pump cannot work efficiently when air movement is restricted. Aim for about 400 cubic feet per minute (CFM) per ton of heating or cooling capacity. This is a useful field target, not an absolute rule. Equipment design, duct layout, humidity, and outdoor temperature can change the correct airflow.
Start with the filter. A clogged filter makes the blower work harder and can reduce comfort across the home. Check it monthly during heavy-use seasons. Replace or clean it according to its design, especially when dust gathers around return grilles. Do not assume a thicker filter is always better. Some high-efficiency filters create excessive resistance in older systems.
Measure, do not guess.
A qualified technician can test airflow, temperature split, and static pressure. These readings reveal problems that a quiet blower may hide. Keep supply vents open and remove furniture blocking return grilles. Sealing leaking ducts can also send more conditioned air into living spaces instead of attics or crawlspaces.
I once saw a system with clean filters but weak airflow. The real problem was a crushed flexible duct behind a storage area. That detail is easy to miss. Another common mistake is setting the blower speed too high without checking pressure. It may increase noise and waste electricity. Airflow adjustments should follow the system’s technical data and local safety requirements.
How to Improve Heat Pump Efficiency and Save Energy?
Improve airflow by targeting about 400 CFM per ton and keeping air filters clean.
The chart applies the common design target of approximately 400 cubic feet per minute (CFM) per ton of heat-pump capacity. Actual airflow should be verified against the equipment manufacturer's specifications. A clogged or highly restrictive filter can reduce airflow, increase fan energy use, and lower system performance, so filters should be inspected and replaced or cleaned according to the filter type and operating conditions.
Tune Controls: Smart Thermostats and 2°F Setbacks Limit Backup Heat
Heat pump efficiency often depends on control settings, not just equipment. In winter, a large thermostat change can call for auxiliary electric resistance heat. That backup heat may consume much more electricity than normal compressor operation. The U.S. Department of Energy advises heat-pump owners to avoid deep setbacks without suitable controls. A modest 2°F setback can reduce unnecessary runtime and limit backup heat. It is a small adjustment, not a magic number.
A smart thermostat can use outdoor temperature, runtime, and recovery behavior. This helps manage the setback more gently. ENERGY STAR reports that certified smart thermostats save about 8% on heating and cooling bills, on average. Results vary by climate, home design, insulation, and settings. Ask a qualified technician to confirm heat-pump staging and auxiliary-heat lockout. Poor compatibility remains an overlooked problem. I have seen comfortable homes waste energy because their thermostats treated heat pumps like furnaces.
Tips: Set the temperature back 2°F during sleep, then recover gradually before waking. Keep emergency heat in its proper mode. Check runtime after cold nights. If backup heat appears frequently, inspect filters, airflow, refrigerant charge, and outdoor coil frost. The Department of Energy and National Renewable Energy Laboratory both stress correct commissioning and controls. Installation quality can matter as much as advertised efficiency. A 2°F setback may save little in a mild, efficient home, but it can prevent abrupt, wasteful recovery.
Maintain Coils and Refrigerant to Protect Rated Capacity and Efficiency
Heat pump efficiency often declines quietly. Dirty coils restrict airflow, raise compressor workload, and reduce delivered heating or cooling. I have seen outdoor coils packed with cottonwood and dust, even when the system sounded normal. The fan ran, but the room temperature barely changed. Switch off power before cleaning. Remove loose debris gently, straighten damaged fins carefully, and keep plants away from the outdoor unit. Indoor evaporator coils also need inspection, especially where pets or renovation dust are present.
Refrigerant condition matters just as much. A low charge can reduce heat transfer, increase running time, and damage the compressor over time. Frost on one section of the coil is a warning, not proof of a specific fault. A qualified technician should check for leaks, measure operating pressures, and verify superheat or subcooling against the equipment’s rated conditions. Guessing the charge can make efficiency worse. Refrigerant work also requires appropriate recovery equipment and trained handling.
Keep service records with cleaning dates, temperature readings, and observed problems. This creates useful evidence when performance changes. I once relied only on a visual inspection, and the real restriction was hidden inside the coil. That mistake was avoidable. Annual professional inspection is sensible, but heavily used systems may need attention sooner. Clear airflow, correct refrigerant charge, and accurate measurements help protect the capacity stated on the rating plate.
| Maintenance Area | What to Check | Recommended Frequency | Useful Performance Indicator | Why It Matters for Capacity and Efficiency | Corrective Action |
|---|---|---|---|---|---|
| Indoor Air Filter | Dust loading, filter fit, airflow blockage, and filter pressure drop. | Every 1–3 months | Compare pressure drop and airflow with the equipment manufacturer's limits. | A dirty filter increases airflow resistance, reduces delivered heating or cooling, and can increase fan energy. | Clean or replace the filter with the correct size and filtration rating. Do not install a filter that exceeds the system's allowable pressure drop. |
| Indoor Coil | Dust, pet hair, biological growth, blocked coil face, and damaged fins. | Inspect annually; clean as needed | Stable airflow, normal supply-air temperature, and no abnormal ice formation. | Coil contamination reduces heat transfer and airflow. In cooling mode, it can also reduce moisture removal and raise operating time. | Isolate power, protect electrical components, and clean the coil using an approved method. Straighten seriously damaged fins where practical. |
| Outdoor Coil | Leaves, grass, dust, snow, ice, restricted clearance, and bent fins. | Inspect monthly during heavy-use seasons | Clear airflow through the coil and normal defrost operation in heating mode. | The outdoor coil absorbs or rejects heat. Blockage raises compressor workload and may reduce heating capacity or cooling efficiency. | Remove debris around the unit, maintain the manufacturer's clearance, and rinse the coil gently from the clean side outward when appropriate. |
| Refrigerant Charge | Signs of leakage, oil residue, abnormal pressures, temperature readings, and charge amount. | Check during professional service or when performance changes | Measured superheat, subcooling, operating pressures, and temperatures must match the manufacturer's service procedure. | Undercharging or overcharging can reduce capacity, lower efficiency, increase compressor stress, and impair defrost or expansion-device control. | Have a qualified technician locate and repair leaks, evacuate the system when required, and charge by the specified method. Do not adjust charge based on pressure alone. |
| Refrigerant Circuit | Insulation condition, vibration, corrosion, damaged tubing, and signs of leakage at joints. | Inspect annually | No visible leakage, secure connections, and intact insulation on designated suction lines. | Heat gain through damaged insulation and refrigerant loss can reduce the temperature difference available for heat transfer and increase run time. | Replace damaged insulation, secure tubing without restricting movement, and arrange certified leak testing for suspected refrigerant loss. |
| Airflow and Duct System | Blocked grilles, closed registers, duct leakage, crushed flexible duct, and unbalanced airflow. | Inspect annually | Measured airflow should remain within the unit's specified operating range. | Insufficient or unbalanced airflow can reduce heat exchange, cause coil icing, and increase compressor and fan operating time. | Open supply and return paths, seal accessible duct leaks, repair crushed ducts, and balance the system when necessary. |
| Outdoor Fan and Motor | Blade cleanliness, unusual noise, vibration, bearing condition, and motor operation. | Inspect annually | Stable fan speed, unobstructed discharge, and no abnormal noise or vibration. | Reduced outdoor airflow limits heat transfer and may cause high operating pressures, reduced capacity, or protective shutdowns. | Remove debris, tighten accessible fasteners, and have electrical or motor faults serviced by a qualified technician. |
| Defrost System | Defrost initiation, completion, outdoor coil icing, sensors, and drainage. | Check before and during the heating season | The coil clears ice appropriately without excessive or continuous defrost cycles. | Insufficient defrost restricts airflow and heat transfer. Excessive defrost uses energy and temporarily reduces heating output. | Keep the outdoor coil and drain path clear. Investigate sensor, control, airflow, or refrigerant problems if icing persists. |
| Condensate Drainage | Drain pan, drain line, trap, pump, and ice or algae blockage. | Inspect annually; more often in humid conditions | Unrestricted drainage with no water overflow or standing water near electrical components. | Blocked drainage can cause water damage, corrosion, shutdowns, and reduced reliability during cooling or defrost operation. | Clear the drain safely, verify slope or pump operation, and confirm that the drain terminates correctly. |
| Temperature and Energy Tracking | Indoor comfort, supply and return temperatures, runtime, and electricity use. | Monthly or after maintenance | Compare trends under similar outdoor conditions rather than relying on a single reading. | A gradual increase in runtime or electricity use can reveal airflow restrictions, coil fouling, control problems, or refrigerant issues before a failure occurs. | Record operating conditions and request professional diagnosis when performance declines without a change in weather or thermostat settings. |
Important: Performance values and service procedures vary by heat-pump design, outdoor temperature, refrigerant, and installation. Use the equipment manufacturer's rated conditions and service data for final diagnosis. Refrigerant recovery, leak repair, evacuation, and charging should be performed by appropriately qualified personnel in accordance with local regulations.
Related Posts
-
10 Best Heat Pump Units for Global Buyers?
-
Top Thermo Pump Manufacturers for Global Buyers?
-

Top Heat Pump Units for Global Buyers in 2026?
-

Top 10 Spa Heat Pumps: Best Options for Efficient Heating in 2023
-

How to Choose the Right Heat Pump System for Your Home?
-
What Are the Top Solar Heat Pump Manufacturers in 2026?